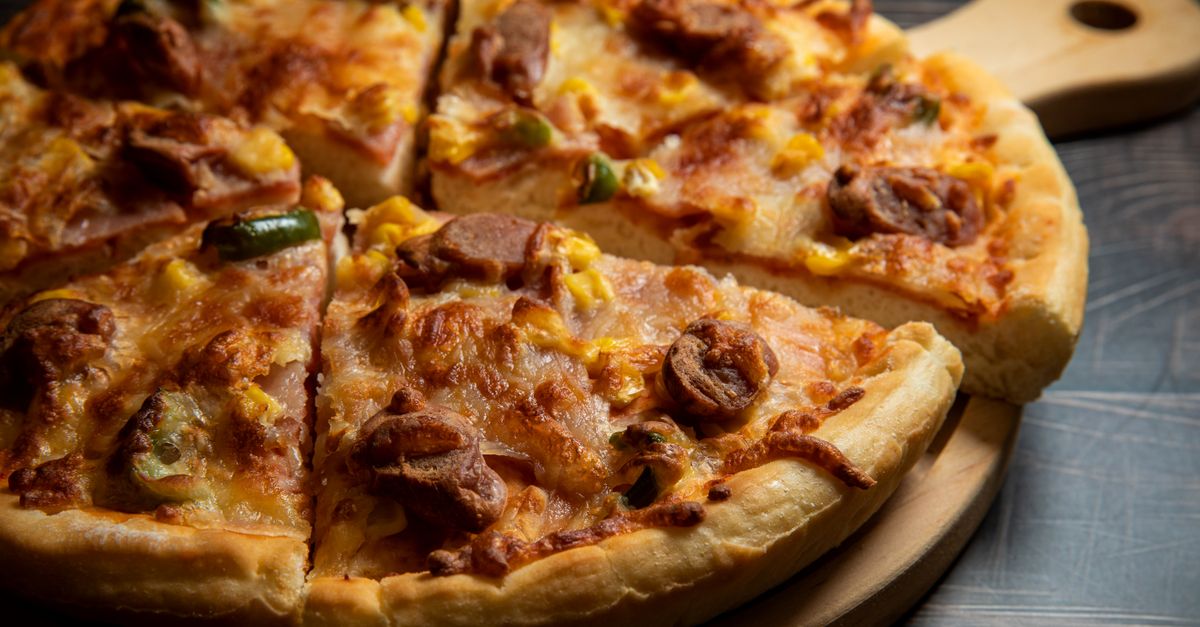
Why Your Homemade Pizza is Doughy, Not Crispy (And The Simple Shifts That Deliver Pizzeria-Quality Crunch Every Time)
For years, my homemade pizza journey was a cycle of hope and disappointment. I’d meticulously top my dough, slide it into a screaming hot oven, and pull it out expecting that glorious, crackling crispness you get from a true Neapolitan pie or a New York slice. Instead, I’d be met with a pale, soft, and often chewy base that sagged under the weight of its toppings. It tasted good, sure, but it wasn’t the pizza I dreamed of. It wasn’t the pizza I’d had in bustling pizzerias where every bite offered that satisfying crunch before yielding to a tender interior.
I tried everything the internet suggested: hotter oven temperatures, different dough recipes, less sauce. Yet, the elusive crispness remained just out of reach. It was a frustrating and deflating experience, especially when I knew my ingredients were fresh and my toppings were delicious. I was pouring my effort into these pizzas, only to have the crust betray my ambitions. The truth, I eventually discovered, wasn’t in any single magic bullet, but in a series of interconnected mistakes that most home cooks make – often without even realizing it. These weren’t just surface-level errors; they were fundamental misunderstandings of how heat, moisture, and dough interact. What changed everything for me was stepping back and re-evaluating every step, from the flour I chose to the moment the pizza hit the cooling rack. Once I understood these hidden culprits, my pizza game transformed from perpetually doughy to consistently crispy, rivaling my favorite local spots.
Key Takeaways
- Achieve genuine crispness by prioritizing maximum, sustained heat transfer directly to the dough’s underside.
- Avoid common moisture traps like excessive sauce or fresh, wet ingredients that steam the crust.
- Understand that oven temperature is only one part of the equation; proper baking surface and preheating are equally crucial.
- Optimize your dough, build your pizza smartly, and manage post-bake cooling for unparalleled crispness.
Your Oven Isn’t Hot Enough (Even When It Says It Is)
This was my biggest misconception. I used to think, “My oven goes to 500°F (260°C), that’s plenty hot, right?” Wrong. While your oven air temperature might reach that, it doesn’t mean your baking surface is retaining and transferring that heat effectively to the pizza dough. Pizzerias use ovens that reach 800-1000°F (425-540°C), often with stone or brick floors that stay incredibly hot, cooking a pizza in mere minutes. This rapid, intense heat is what creates that instantaneous crisping and leopard-spotted char.
For a home oven, you need to compensate for this lower maximum temperature by maximizing the heat stored in your baking surface. A thin metal pizza pan, even a dark one, just won’t cut it. It heats up quickly but loses heat just as fast when cold dough is placed on it, leading to a steamed bottom rather than a seared one. In my experience, the game-changer was investing in a proper pizza steel. A pizza stone is a good step up, but a steel, being denser and more conductive, stores significantly more thermal energy. I use a 1/4-inch thick steel, and it was worth every penny. It acts like a heat battery, rapidly transferring intense heat to the bottom of the dough, simulating that pizzeria oven floor.
But owning a steel isn’t enough. You have to superheat it. This means preheating your oven, with the steel inside, on the highest rack (or second highest, depending on your oven’s top element placement) for at least one full hour, or even 90 minutes. I know, it sounds excessive, but this ensures the steel isn’t just hot, but saturated with heat. I set my oven to 550°F (290°C) – or whatever its maximum is – and let it go. The difference this sustained heat makes to the crust’s texture is monumental. Without it, you’re essentially baking on a surface that quickly cools, and your pizza will be doughy and sad.
You’re Drowning Your Pizza in Moisture
Pizza, at its heart, is a delicate balance. Too much moisture, and you create steam, which is the enemy of crispness. I used to be guilty of this in so many ways: too much sauce, wet mozzarella, and fresh vegetables piled high. Each of these adds water that has to evaporate before the crust can even think about crisping.
Let’s break down the common moisture culprits:
- Excessive Sauce: A thick layer of sauce creates a barrier, preventing direct heat transfer to the dough and actively steaming it. Think minimal. A thin, even layer is all you need. For a 12-14 inch pizza, I use no more than 1/4 cup of sauce, spread right to the edges. Choose a thicker sauce if possible, or reduce a standard canned sauce slightly on the stovetop to cook off some water. My go-to is San Marzano crushed tomatoes, seasoned simply, and sometimes cooked for 10-15 minutes to thicken.
- Wet Cheese: Fresh mozzarella is delicious, but it’s often packed in water. If you don’t drain and dry it properly, that excess moisture will seep into your crust. I now tear fresh mozzarella into smaller pieces, place them on paper towels, and blot them dry for about 30 minutes before topping the pizza. Even low-moisture shredded mozzarella can benefit from being patted dry if it looks particularly wet.
- Fresh Vegetables: Tomatoes, mushrooms, onions, and bell peppers all release significant amounts of water when cooked. If you load them on raw, they’ll steam your pizza. The solution? Preheat or sauté them slightly before adding them to your pizza. For mushrooms and onions, a quick sauté in a hot pan drives off a lot of water. For fresh tomatoes or other very wet veggies, consider adding them halfway through the bake, or roasting them separately beforehand. This step, though seemingly extra, is critical for a truly crispy result.
You’re Not Using the Right Dough (Or Handling It Wrong)
The foundation of any great pizza is the dough. If your dough is too wet, too thick, or improperly handled, you’re fighting an uphill battle for crispness. A high-hydration dough (one with a lot of water) is excellent for creating airy, open crumbs in the crust, but it also means more water needs to evaporate. While I love a high-hydration dough for its texture, achieving crispness requires careful management.
Here are the dough-related insights that clicked for me:
- Dough Hydration: For truly crispy results in a home oven, I’ve found that a hydration level between 60-65% works best. Anything much higher (like 70%+) becomes challenging to crisp up without burning the toppings. Experiment with slightly lower hydration if you’re still struggling. A less hydrated dough will still be pliable but will release its moisture faster.
- Stretching, Not Rolling: Resist the urge to use a rolling pin. Rolling pushes out all the gas bubbles that give your crust structure and some of its coveted crispness. Instead, learn to stretch your dough by hand. This preserves the internal structure and allows for a more open crumb. Aim for an even thickness across the base, with slightly thicker edges for a good crust. A thin base (around 1/8 inch or 3mm) is crucial for quick cooking and crisping.
- Minimal Flour: When stretching, use only enough flour to prevent sticking. Excess flour on the bottom of your dough will burn on the hot steel or stone, creating an off-flavor and a powdery, not crispy, bottom. Lightly dust your peel with semolina flour or a mix of semolina and all-purpose flour. Semolina acts like tiny ball bearings, helping the pizza slide off smoothly without clumping.
- Cold Dough is Bad Dough (for Launching): Ensure your dough has come to room temperature for at least 60-90 minutes before stretching. Cold dough is stiff, difficult to stretch, and more likely to tear, leading to uneven thickness and potential steam traps. A properly relaxed, room-temperature dough will stretch beautifully.
Launching and Baking Technique: Every Second Counts
Even with the perfect dough and properly preheated steel, the way you launch and bake your pizza can make or break its crispness. Timing and movement are everything in those crucial first few minutes.
- The Quick Launch: Once your pizza is built on the peel, you need to launch it onto the hot steel as quickly and confidently as possible. Any hesitation means the dough starts to stick to the peel, leading to a botched launch and a misshapen, uneven pizza. Practice with a naked dough on the peel a few times if you’re nervous. A quick, decisive shimmy is key.
- Don’t Overload the Peel: This goes back to the moisture and quick launch points. If you take too long to top the pizza, or if your toppings are too heavy, the dough can start to stick to the peel. I usually prepare all my toppings before stretching the dough, so once the dough is on the peel, I can top it and launch it within 60-90 seconds. This minimal time on the peel is crucial.
- Strategic Placement: Place the pizza on the steel, making sure it’s roughly centered. For the first 3-4 minutes, the goal is to get that bottom crust searing. Resist the urge to open the oven door during this phase. If you notice one side browning faster, after about 3-4 minutes, you can carefully rotate the pizza using your peel or a pair of tongs. After another 2-3 minutes, if your oven has a strong broiler, you can briefly (30-60 seconds) switch to the broiler to get some char on the top crust and melt the cheese to bubbly perfection. Watch it like a hawk under the broiler; it can go from perfect to burnt in seconds.
- Consider a Two-Phase Bake: For larger or more heavily topped pizzas, I sometimes do a two-phase bake. I bake the pizza with just sauce and half the cheese for 5-6 minutes on the steel, pull it out, add the rest of the cheese and toppings, then return it to the oven for another 5-7 minutes. This allows the bottom crust to get a head start on crisping before being weighed down by all the toppings.
The Forgotten Final Step: Cooling Properly
This is a mistake almost everyone makes, and it’s so simple to fix. You’ve just pulled your magnificent, crispy-looking pizza out of the oven. What do you do? Most people slide it straight onto a cutting board or, worse, a solid plate. Stop right there! If you let your pizza cool on a flat surface, steam gets trapped underneath, quickly turning that glorious crispy crust soggy. It’s the same principle as cooling cookies on a wire rack versus a sheet pan.
The moment your pizza comes out of the oven, transfer it immediately to a wire cooling rack. This allows air to circulate freely around the entire crust, letting any residual steam escape. Leave it on the rack for at least 3-5 minutes before slicing. This brief cooling period not only preserves crispness but also helps the cheese set slightly, preventing it from sliding off with the first slice. It’s a small step, but it makes a huge difference in maintaining that hard-earned crispness.
In my journey, this series of small, intentional adjustments transformed my homemade pizza from a decent attempt into a truly fantastic, crispy-crusted masterpiece. It’s not about finding one magic trick, but about understanding the science behind crispness and respecting each step of the process. Armed with these insights, you can finally say goodbye to doughy pizza and hello to pizzeria-quality crunch, right in your own kitchen.
Frequently Asked Questions
Q: Can I use a baking sheet instead of a pizza stone or steel for a crispy crust?
A: While you can bake pizza on a baking sheet, it’s very difficult to achieve true crispness. Baking sheets don’t retain heat as well as a stone or steel, meaning they lose temperature rapidly when cold dough is placed on them. This leads to steaming rather than searing, resulting in a softer, doughier bottom crust. If a stone or steel isn’t an option, preheat your heaviest baking sheet for at least 30 minutes on the highest rack, and consider placing it upside down to make sliding the pizza easier.
Q: My pizza toppings are burning before the crust gets crispy. What am I doing wrong?
A: This is a common issue when your baking surface isn’t hot enough, or your toppings are too close to the top heating element. Ensure your pizza steel or stone is thoroughly preheated for at least an hour. You might also need to lower your oven rack slightly, or avoid using the broiler for too long. Pre-cooking wetter vegetables can also help, as it reduces their cooking time on the pizza. Another trick is a ‘two-phase bake,’ where you bake the crust and some cheese first, then add more delicate toppings later.
Q: How much flour should I use on my pizza peel to prevent sticking?
A: Use minimal flour, preferably semolina or a 50/50 mix of semolina and all-purpose flour. Semolina’s coarser texture acts like tiny ball bearings, helping the dough slide easily without clumping or burning. Lightly dust your peel, then shake off any excess before placing the stretched dough on it. Too much flour will burn and give your crust a bitter, powdery taste.
Q: What’s the ideal dough hydration for a crispy crust in a home oven?
A: For optimal crispness in a home oven, I recommend a dough hydration between 60-65%. While higher hydration (70%+) can create a lighter, airier crust, it requires more skill and a very high-temperature oven to achieve crispness without becoming chewy. Lower hydration doughs release moisture more quickly, making crisping easier.
Q: Should I cook my pizza on parchment paper for crispiness?
A: Avoid cooking pizza directly on parchment paper if your goal is a crispy bottom crust. Parchment paper acts as an insulator, blocking direct heat transfer from your hot pizza stone or steel to the dough. This will inevitably lead to a softer, less crispy bottom. Use parchment only for transferring the pizza, and remove it immediately after the pizza has set (1-2 minutes) or, ideally, launch directly onto the hot surface.
Written by Maria Rodriguez
Time management, productivity, and consumer tips
A veteran journalist, Maria brings a keen eye for detail and a knack for finding the best deals and little-known life hacks.
You Might Also Like
Why Your Homemade Gravy Is Lumpy (And What Actually Works for Silky-Smooth Perfection Every Time)
Stop making lumpy gravy! Discover why traditional methods fail and learn the simple, pro techniques for perfectly smooth, rich gravy every time.

Why Your Homemade Sauces Are Gritty, Not Smooth (And The Simple Shifts That Guarantee Silky Perfection Every Time)
Stop settling for gritty sauces. Discover the non-obvious mistakes home cooks make and the simple, professional shifts for velvety-smooth perfection.
Why Your Homemade Pie Crust Shrinks (And The Simple Shifts That Guarantee Perfect, Flaky Edges Every Time)
Stop wrestling with shrinking pie crusts! Discover the simple, often overlooked secrets to perfectly stable, flaky edges that hold their shape.