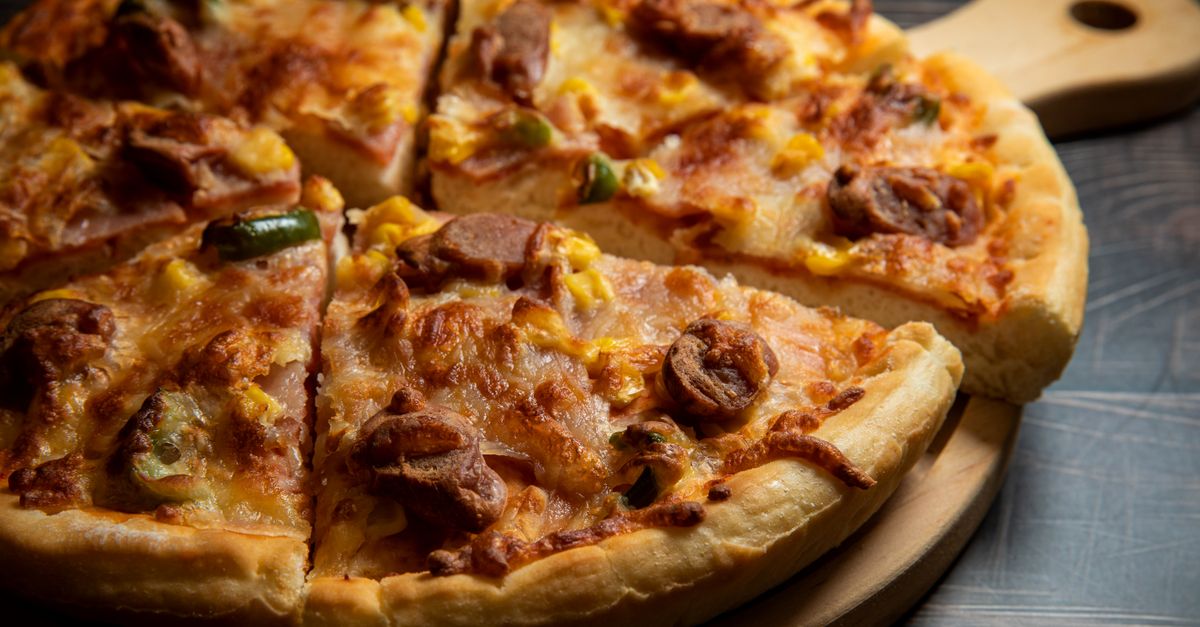
Why Your Homemade Pizza Is Soggy (And The Pro Secrets for Crispy Crust Every Time)
You’ve spent the afternoon crafting the perfect dough, carefully layering your favorite toppings, and anticipating that first glorious bite of homemade pizza. But instead of a satisfying crunch, you get a sad, soggy bottom. Your toppings slide off, the cheese congeals, and your dreams of a pizzeria-quality experience at home vanish faster than a free slice. I know this frustration intimately because I’ve lived it countless times. For years, my homemade pizzas were consistently disappointing – more like a bread boat carrying toppings than a crispy, flavorful canvas. I blamed my oven, my recipe, even the humidity. What I finally realized was that the problem wasn’t a single, obvious culprit, but a series of small, often overlooked mistakes that collectively conspired against crispness. This isn’t about buying expensive equipment or mastering complex techniques. It’s about understanding the fundamental physics and culinary science behind achieving that elusive crispy crust, and implementing surprisingly simple shifts that will transform your pizza game forever. Stop settling for subpar, soggy pizza. Let’s make every pizza night a triumph.
Key Takeaways
- The right baking surface (pizza steel or stone) and preheat temperature are critical for initiating a rapid crust set.
- Managing dough hydration and proper stretching prevents an overly wet base that steams rather than bakes.
- Thoughtful topping selection and strategic layering prevent excessive moisture and promote even cooking.
- Understanding residual heat management and a final ‘drying’ phase is key to preventing re-sogginess.
Your Oven Isn’t Hot Enough (And Your Baking Surface Is a Mismatch)
This is the cardinal sin of soggy pizza, and it’s the mistake I made for years. Most home ovens, even when set to their highest temperature, struggle to replicate the intense, radiant heat of a commercial pizza oven. But it’s not just the air temperature that matters; it’s the heat transfer to the bottom of your dough. When your pizza hits a lukewarm surface, it begins to steam and cook slowly, leading to a limp, pale crust. You need an almost instantaneous heat shock to set the base.
The Mistake I See Most Often: People slide their pizza onto a cold baking sheet, a flimsy aluminum pan, or a pizza stone that hasn’t been preheated long enough. A cold or insufficiently heated surface means slow initial cooking, and slow cooking means steam, not crispness.
What Changed Everything For Me: Investing in a pizza steel (or a thick pizza stone) and radically rethinking my preheating strategy. A pizza steel is denser than a stone, retains more heat, and transfers it to the dough more efficiently. I used to preheat my oven for 20-30 minutes, thinking that was enough. It’s not. For a truly crispy crust, your baking surface needs to be saturated with heat.
Actionable Insight:
- Invest in a Pizza Steel or Thick Stone: If you’re serious about crispy pizza, this is non-negotiable. A good steel (1/4 to 3/8 inch thick) or a quality stone will make the biggest difference. It creates the super-hot surface your dough needs.
- Preheat for an Hour, Minimum: Turn your oven to its highest setting (usually 500-550°F or 260-290°C) with your pizza steel or stone on the top rack (or second from top, depending on your broiler). Let it preheat for at least one hour, preferably 90 minutes. This allows the steel/stone to absorb and radiate maximum heat, creating a thermal mass that mimics a brick oven floor.
- Utilize the Broiler (Strategically): If your oven goes high enough, engage the broiler for the last 5-10 minutes of preheating to supercharge the top of your steel. This creates intense radiant heat from above, helping to cook the toppings and char the crust edges simultaneously with the base.
When your pizza hits this super-hot surface, the water in the dough rapidly turns to steam and escapes, creating those beautiful air pockets and an instant crisping effect on the bottom.
Your Dough is Too Wet or Under-Proofed (Or Both)
Many recipes for beginner pizza dough aim for a higher hydration (more water) to make it easier to handle. While good for texture, excessive water, especially when combined with insufficient proofing, can lead to a dense, gummy crust that struggles to crisp up. An under-proofed dough also won’t develop enough internal structure and air pockets to achieve that light, airy chew.
The Mistake I See Most Often: Using a very high-hydration dough (70%+ water to flour ratio) without accounting for how that moisture needs to escape. Also, not letting the dough rest and rise adequately, resulting in a tight, heavy base.
What Changed Everything For Me: Understanding that dough hydration is a spectrum, and for home ovens, a slightly lower hydration (around 60-65%) often yields better results for crispness without sacrificing tenderness. Also, paying meticulous attention to proofing times and visual cues.
Actionable Insight:
- Optimize Dough Hydration: For home ovens, aim for a hydration level between 60-65% (grams of water divided by grams of flour). This provides enough moisture for a tender crumb but less excess water to steam out, allowing for quicker crisping. Experiment to find what works best for your flour and climate.
- Long, Slow Cold Fermentation (Cold Proofing): This is a game-changer. After mixing and a short bulk fermentation (1-2 hours at room temperature), divide your dough into balls and place them in individual, lightly oiled, airtight containers in the refrigerator for 24-72 hours. Cold fermentation develops incredible flavor, makes the dough easier to handle without it tearing, and most importantly, allows the yeast to slowly break down starches, creating a lighter, more extensible dough that crisps better.
- Proper Room Temperature Proofing (Final Rise): Before shaping, take your cold-proofed dough balls out of the fridge and let them come to room temperature for 1-3 hours. They should feel soft, pliable, and airy, almost like a pillow. This final proof is crucial for developing the gases that give your crust its open, chewy texture, which is essential for crisping.
When you shape a well-proofed, properly hydrated dough, it stretches easily, forms a thin base, and has enough internal structure to create a light, crispy final product.
You’re Overloading Your Pizza (And Neglecting Moisture-Rich Toppings)
It’s tempting to pile on every delicious topping you can imagine, but a heavy hand with ingredients is a direct ticket to a soggy pizza. Each topping, especially fresh vegetables, cheese, and sauce, contains water. Too much water on top translates to too much steam, which then gets trapped by the crust and prevents it from crisping.
The Mistake I See Most Often: Using too much sauce, excessive fresh mozzarella (which is very wet), and piling on raw vegetables that release a lot of moisture during baking.
What Changed Everything For Me: Adopting a minimalist approach to toppings and understanding how to manage moisture from high-water content ingredients. Less is often more when it comes to pizza.
Actionable Insight:
- Go Light on the Sauce: Apply sauce sparingly. Think of it as a flavorful base, not a thick layer. A thin coating allows the crust to breathe and prevents a ‘steamed’ effect. I usually use 1/4 to 1/3 cup of sauce for a 12-14 inch pizza, spread almost to the edge, but not completely to the cornicione (crust edge).
- Manage Wet Cheeses: If using fresh mozzarella (like buffalo mozzarella), tear it into smaller pieces and blot it with a paper towel to remove excess liquid before placing it on the pizza. Alternatively, use a drier, low-moisture mozzarella, or a blend of cheeses. Consider adding fresh mozzarella after the initial bake if you want its creamy texture without the sogginess risk.
- Pre-Cook or Dry Moisture-Rich Toppings: For vegetables like mushrooms, bell peppers, or onions, consider sautéing them briefly beforehand to drive out excess water. Spinach should be thoroughly squeezed dry. Meats like sausage or bacon should be pre-cooked and drained of fat. For toppings that are naturally high in water (like pineapple, if you’re into that!), a quick roast can help. The less water they bring to the party, the crisper your pizza will be.
- Strategic Topping Placement: Don’t crowd the center. Distribute toppings evenly, leaving a little space between them. This promotes better airflow and more even cooking. And always leave that beautiful rim of dough (cornicione) clear for optimal puff and char.
By being mindful of moisture and quantity, you allow your pizza to bake, not steam, leading to a much crisper result.
Your Shaping Technique Creates Thick Spots (And You’re Not Using Semolina)
The way you stretch and shape your dough has a direct impact on how it bakes. If your dough is uneven, with thick spots in the middle or along the edges, those areas will take longer to cook and retain more moisture, leading to a chewy (in a bad way) or soggy texture. Also, without the right medium to prevent sticking, you risk tearing your beautifully shaped dough when transferring it to the hot oven, leading to a misshapen, thick mess.
The Mistake I See Most Often: Rolling dough with a pin (which pushes out air and toughens the crust), or stretching haphazardly, leaving a thick, dense center. Also, using too much flour on the peel, which can burn and create a bitter taste.
What Changed Everything For Me: Learning to hand-stretch dough properly to preserve air and achieve an even thickness, and discovering the magic of semolina flour for launch.
Actionable Insight:
- Hand-Stretch Your Dough: Avoid rolling pins. Gently press out the dough from the center outwards with your fingertips, leaving the outer rim (cornicione) slightly thicker. Then, lift the dough and use gravity, letting it drape over your knuckles, gently rotating and stretching until it reaches your desired size and an even thickness (about 1/8 to 1/4 inch thick in the center). This preserves the air bubbles developed during proofing, essential for a light, airy, and crispy crust.
- Use Semolina Flour on Your Peel: Instead of all-purpose flour, dust your pizza peel (or parchment paper) generously with fine semolina flour. Semolina has a coarser texture, acting like tiny ball bearings that allow your pizza to slide off the peel effortlessly into the hot oven. It also absorbs less moisture than regular flour, meaning less raw flour sticking to your crust and burning, and a crisper bottom.
- Work Quickly and Confidently: Once your dough is stretched and on the semolina-dusted peel, work efficiently. Add sauce and toppings without hesitation. The longer it sits on the peel, the more moisture it absorbs, increasing the risk of sticking. A quick, confident slide into the oven is key.
Achieving an evenly thin base and a smooth, unhindered transfer to the hot baking surface ensures that every part of your crust gets the intense heat it needs to crisp up beautifully.
You’re Taking It Out Too Soon (And Ignoring Residual Heat)
Many home cooks pull their pizza from the oven the moment the cheese is bubbly and golden, or the edges look browned. While these are good indicators, it’s often not enough, especially for the very bottom crust. The residual heat from the baking surface and the pizza itself continues to cook the crust for a short period after it comes out of the oven. If it’s not quite done, this residual heat might just finish off the sogginess, rather than the crispness.
The Mistake I See Most Often: Impatience. Pulling the pizza out too early because the toppings look good, or not letting it rest properly.
What Changed Everything For Me: Realizing that the sound of the crust is as important as the look, and that a brief resting period on a cooling rack is non-negotiable.
Actionable Insight:
- Aim for a Darker Bottom Crust: Don’t be afraid of a little char! Use a metal spatula to lift the edge of your pizza while it’s still in the oven to check the bottom. You want to see deep golden brown, even some slightly blackened spots, not pale or light brown. This indicates sufficient caramelization and crispness.
- Use the Broiler at the End (Optional, but Effective): If your bottom crust looks great but the top needs more color, switch to the broiler for the last 30-90 seconds (watch it like a hawk!). This provides a quick burst of intense top-down heat to brown cheese and blister the crust edges without overcooking the bottom.
- Rest on a Wire Rack: This is crucial. Never transfer a hot pizza directly to a solid cutting board or plate. The trapped steam will immediately re-soggy your beautiful crust. Instead, slide the finished pizza onto a wire cooling rack for 2-5 minutes. This allows air to circulate around the bottom, letting any trapped steam escape and setting the crispness you’ve worked so hard for.
- Listen to Your Pizza: A truly crispy pizza will make a distinct hollow sound when you tap the bottom of the crust. If it sounds dull, it might still have too much moisture. Practice this and you’ll develop an ear for perfect crispness.
By ensuring thorough cooking, especially on the bottom, and managing residual heat, you guarantee that your pizza stays crispy from oven to table.
Frequently Asked Questions
What type of flour is best for a crispy pizza crust?
For crispy crusts, a good quality bread flour or ‘00’ pizza flour is ideal. Bread flour has a higher protein content, which develops gluten more readily, leading to a strong, chewy crust with good structure that crisps well. ‘00’ flour is finely milled and results in a very tender crumb, but can also achieve excellent crispness when baked at high temperatures.
Can I make a crispy pizza crust in a regular home oven without a pizza steel or stone?
Yes, but it’s more challenging. You can still achieve decent crispness by preheating a heavy baking sheet or cast iron pan at your oven’s highest temperature for at least 30-45 minutes. The key is still that initial burst of high heat. However, a pizza steel or stone will always give superior results due to their ability to retain and transfer heat more effectively.
My pizza always sticks to the peel. What am I doing wrong?
This is usually due to insufficient dusting agent or working too slowly. Make sure your pizza peel is completely dry before dusting generously with fine semolina flour. Semolina acts like tiny ball bearings and prevents sticking. Stretch your dough directly on the semolina-dusted peel, add toppings quickly, and then give the peel a few gentle shakes to ensure the pizza slides freely before transferring it to the oven. If it snags, lift a corner and add more semolina underneath.
How can I tell if my dough is properly proofed?
Press a floured finger gently into the dough. If the indentation springs back immediately, it’s likely under-proofed. If it collapses completely, it’s over-proofed. If it springs back slowly, leaving a slight indentation, it’s perfectly proofed and ready to go. The dough should also look airy and have visible bubbles.
Is it better to put cheese directly on the sauce or on top of other toppings?
For a crispier crust and to prevent a soggy base, it’s generally better to put a thin layer of cheese directly on the sauce first, then add other toppings. This acts as a barrier, protecting the crust from the moisture of the sauce and toppings. If you’re using fresh mozzarella, you might add a portion of it towards the end of the bake to prevent excessive water release.
Making truly crispy homemade pizza isn’t about magic; it’s about mastering a few key principles. By understanding how heat transfer, dough hydration, topping management, and proper technique all interact, you can elevate your pizza game from frustratingly soggy to consistently sublime. Start with a super-hot steel, perfect your dough, be mindful of your toppings, and finish strong. Each of these steps, while seemingly small, builds towards that glorious, crackling crust you’ve been dreaming of. It took me years to put these pieces together, but once I did, my pizza nights were never the same. Yours won’t be either. Embrace these changes, and prepare for pizza perfection.
Written by Ben Carter
DIY, home hacks, and sustainable living
With a background in community organizing, Ben is passionate about sustainable living and practical home solutions.
You Might Also Like
Why Your Homemade Gravy Is Lumpy (And What Actually Works for Silky-Smooth Perfection Every Time)
Stop making lumpy gravy! Discover why traditional methods fail and learn the simple, pro techniques for perfectly smooth, rich gravy every time.

Why Your Homemade Sauces Are Gritty, Not Smooth (And The Simple Shifts That Guarantee Silky Perfection Every Time)
Stop settling for gritty sauces. Discover the non-obvious mistakes home cooks make and the simple, professional shifts for velvety-smooth perfection.
Why Your Homemade Pie Crust Shrinks (And The Simple Shifts That Guarantee Perfect, Flaky Edges Every Time)
Stop wrestling with shrinking pie crusts! Discover the simple, often overlooked secrets to perfectly stable, flaky edges that hold their shape.